TALENT: How Do I Resize My Photos?

Edited

If you are finding that your headshots are too large to upload to your profile, this article will help you adjust them to the perfect size. We have provided simple, step-by-step instructions for both Mac and PC users to ensure your professional photos meet the Casting Frontier upload requirements quickly and easily.


How to Resize on Mac

If you are using an Apple computer, you can use the built-in Preview app to adjust your image dimensions.

  1. Open your headshot in the Preview app. This application comes as standard on Apple computers. 

    <!DOCTYPE html> <html> <head> <title>TALENT: How do I use the Preview app on my Mac to view and edit my headshots?</title> </head> <body>  <h1>TALENT: How do I use the Preview app on my Mac to view and edit my headshots?</h1>  <p>This article provides talent with a simple guide on how to use the macOS Preview app to view, crop, and manage their professional headshots. We will cover the basic tools you need to ensure your photos look their best before you upload them to your profile.</p>  <hr>  <h2>Article Contents</h2> <ul>   <li>How do I open a photo in Preview?</li>   <li>How do I crop my headshot?</li>   <li>How do I resize an image for faster uploading?</li>   <li>How do I export my edited photo?</li> </ul>  <hr>  <h2>How do I open a photo in Preview?</h2> <p>Preview is the default application on Mac for most image files. To get started, follow these steps:</p> <ol>   <li>Locate the image file on your computer.</li>   <li>Double-click the file to open it automatically in Preview.</li>   <li>If it opens in a different app, right-click the file, select <strong>Open With</strong>, and choose <strong>Preview</strong>.</li> </ol>  <h2>How do I crop my headshot?</h2> <p>If you need to adjust the framing of your photo to focus more on your face, you can use the selection tool:</p> <ol>   <li>Click and drag your cursor over the area of the photo you want to keep.</li>   <li>To keep a specific aspect ratio, hold the <strong>Shift</strong> key while dragging.</li>   <li>Once you have selected the area, go to the <strong>Tools</strong> menu and select <strong>Crop</strong>, or press <i>Command + K</i> on your keyboard.</li> </ol>  <h2>How do I resize an image for faster uploading?</h2> <p>Sometimes high-resolution files are too large for web uploads. You can reduce the dimensions here:</p> <ol>   <li>Go to the <strong>Tools</strong> menu at the top of the screen.</li>   <li>Select <strong>Adjust Size...</strong></li>   <li>Ensure "Resample image" is checked.</li>   <li>Change the width or height to your desired size (usually 2000 pixels on the long edge is plenty for web use).</li>   <li>Click <strong>OK</strong>.</li> </ol>  <h2>How do I export my edited photo?</h2> <p>To make sure you don't overwrite your original high-quality file, it is best to export a new version:</p> <ol>   <li>Go to <strong>File</strong> in the top menu bar.</li>   <li>Select <strong>Export...</strong></li>   <li>Choose your desired format (JPEG is typically best for headshots).</li>   <li>Rename the file so you can distinguish it from the original.</li>   <li>Click <strong>Save</strong>.</li> </ol>  <hr>  <h2>FAQ's</h2> <p><strong>Will cropping my photo reduce the quality?</strong></p> <p>Cropping removes pixels from the edges, so the overall file size will be smaller. However, as long as you aren't zooming in too far on a low-resolution original, it should still look great on your profile.</p>  <p><strong>Can I undo a crop if I make a mistake?</strong></p> <p>Yes! You can go to <strong>Edit</strong> and select <strong>Undo</strong>, or press <i>Command + Z</i>. If you have already saved and closed the file, you may not be able to undo the change unless you have a backup of the original.</p>  </body> </html>

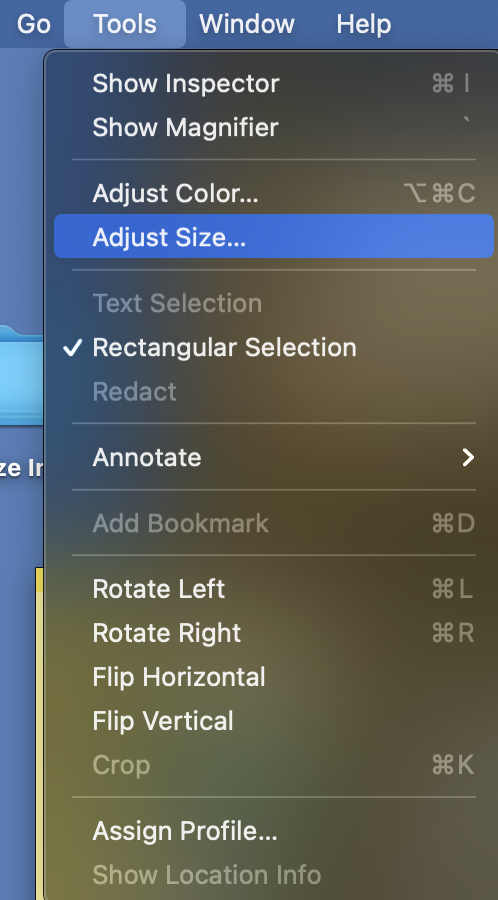
  2. On the Toolbar at the top of your screen, click on Tools

    Screenshot of the macOS menu bar for the Preview app, featuring the Apple logo and menu options: Preview, File, Edit, View, Go, Tools, Window, and Help.

  3. In the Tools menu, click on Adjust Size

    MacOS Preview 'Tools' menu open, with 'Adjust Size...' highlighted. Other options include Inspector, Magnifier, Color, Annotate, and Rotate.

  4. On the Adjust Size tool, first make sure the unit of measurement is set to pixels and the Scale proportionally box is checked. Then, adjust the smaller of the two dimensions (most likely the Width if your headshot is in Portrait Orientation) to 1000 pixels. If Scale proportionally is checked, the other dimension will also adjust. 

    Screenshot of an image resizing dialog box showing a width of 1000 pixels, height of 1333, and a resulting file size reduction to 402 KB.

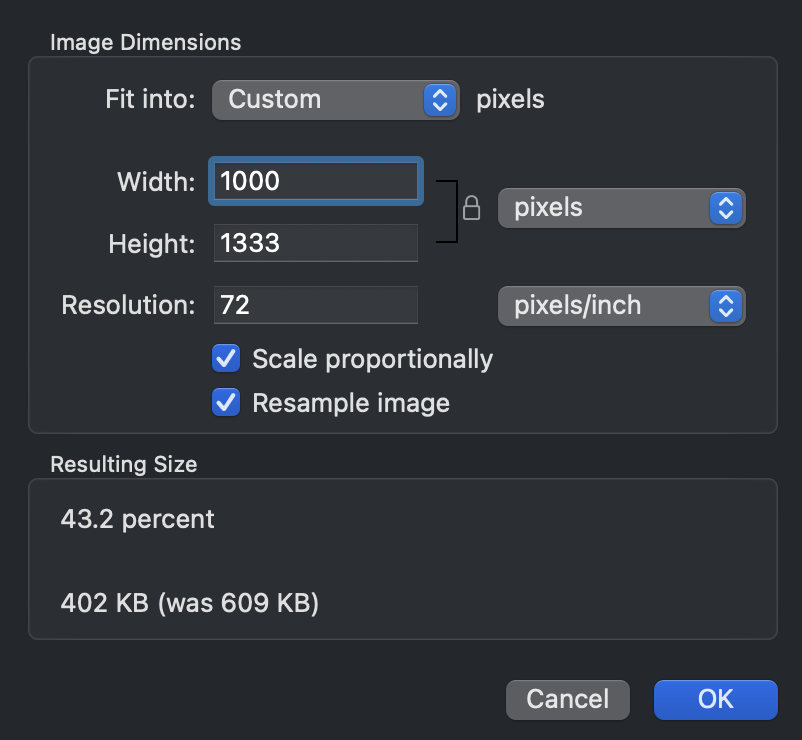
  5. Click OK. Your photo is now resized and you should be able to upload it to your Casting Frontier account!

How to Resize on PC

For Windows users, the native Photos app is the quickest way to get your headshots ready for upload.

  1. Open your headshot in the Photos app. This application comes as standard on Windows computers. 

    A stylized app icon featuring a blue mountain peak against a purple and blue gradient sky with a white sun or moon.

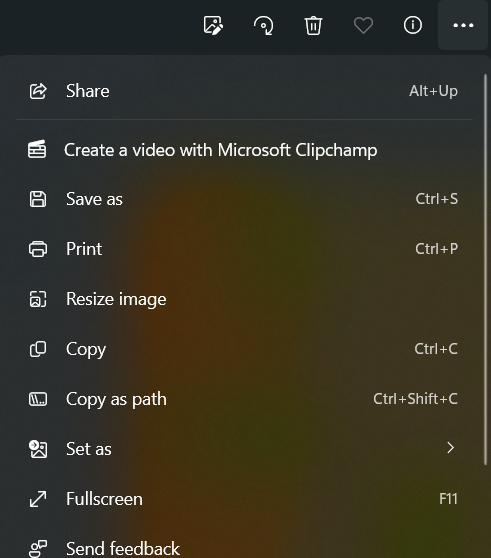
  2. On the menu at the top of the window, click on the ellipsis button (...)

    Dark mode toolbar for an image viewer featuring icons for edit, rotate, delete, favorite, info, more options, zoom out, zoom in, 100% scale, and window controls.

  3. On the menu that opens, select Resize image

    A screenshot of a context menu in the Windows Photos app. The menu includes options like Share (Alt+Up), Create a video with Microsoft Clipchamp, Save as (Ctrl+S), Print (Ctrl+P), Resize image, Copy (Ctrl+C), and Fullscreen (F11). A top toolbar shows icons for editing, rotating, and deleting.

  4. On the Resize menu, first make sure the unit of measurement is set to pixels and the link in between the Width and Height fields shows as linked. Then, adjust the smaller of the two dimensions (most likely the Width if your headshot is in Portrait Orientation) to 1000 pixels. If the link is connected, the other dimension will also adjust. 

    Image resize dialog box showing dimensions being increased from 397x696 pixels to 1000x1753 pixels with an 80% quality slider.

  5. Click the Save button. Your photo is now resized and you should be able to upload it to your Casting Frontier account!

Was this article helpful?

Sorry about that! Care to tell us more?

Thanks for the feedback!

There was an issue submitting your feedback
Please check your connection and try again.